Categories
Food Recipes

How You Can Make Poundo Yam With Blender At Home

The hassles and difficulty involved in making pounded yam through the conventional way of using mortal and pestle has led many people to delete the meal from their family’s menu. In recent times, the proliferation of an alternative — poundo yam; a powder/ flour type that produces a similar result appears to be the way out.

However, many people especially those familiar with the original taste of pounded yam were not satisfied with the taste and the stretchy form of the poundo yam dough. This could be as a result of added preservatives and other additives that have impeded on the quality, appearance and other organoleptic properties of poundo yam.

Poundo yam & egusi soup
Photo: urnaija.com

How To Process Poundo Yam With Blender

While this dislike for the powdered alternative appears to be growing geometrically in number, it will surprise some of you to know that making pounded yam can actually be done with a good food processor popularly called powerful blender. The good thing about this is that you know exactly what goes into the making of your pounded yam. Hey! let’s see how this is done.

Ingredients for Poundo Yam

  • A TUBER OF YAM
  • SALT (Optional)
  • WATER

Method for Preparing Your Own Poundo Yam

  • Cut the tuber of yam into pieces and peel the skin.
  • Cut the yam pieces into smaller pieces and wash under running water thoroughly.
  • Pour into a cooking pot and add enough salt to taste if you do not mind and water to cover up the yam. Do not forget to cover the pot.
  • Check the yam for tenderness. Normally the yam should be quite tender between 20-30 minutes. If not keep on cooker until tender.
  • When tender, drain the water and pour the yam into a clean plate.
  • Using a knife or a folk, mash the cooked yam pieces so that the blades of the blender can easily run through them.
  • Pour the mashed yam into a food processor or blender.
  • Run the blender for few seconds (6-10s) and stop. Do this twice or thrice before running the the blender until the yam turn dough like and stretchy. Do that to the remaining cooked tender yam pieces.
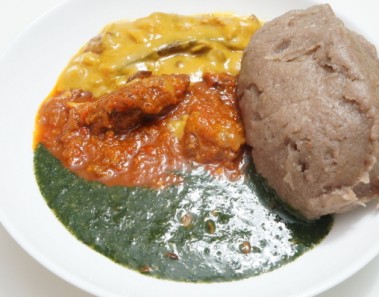
  • Scoop out the stretchy yam dough and do not forget to dress it up in the plate to form a nice looking pounded using a big plastic spoon or what is called Igbako by the Yorubas….Yea….Your pounded yam is ready
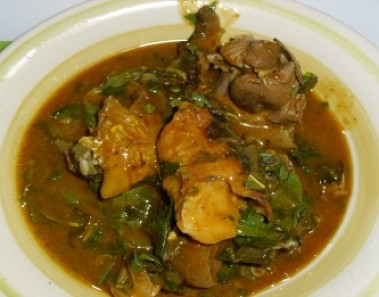
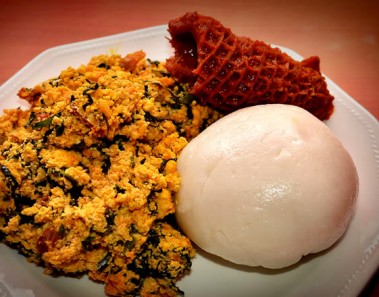
  • Serve with a delicious Egusi Soup, Vegetable soup or just any other soup of your liking.

Absolutely, you can eat pounded yam without going through much difficulty. Try this out with a good blender or food processor and get back to us as regards the result.

VIDEO COMING SOON…WATCH OUT!

ALSO SEE: Solutions For Yams Turning Yellow, Brown When Peeling

Categories
Smoothies

How To Make Healthy Juice From Ugwu (Pumpkin Leaf) At Home

For me, nothing is richer and healthier than been able to make everything right in your small or large size kitchens as you have it. This way you determine what goes in or goes out. Usually, it is a better option than most of the concoction that we consume outside even so called drugs.

Have you ever heard our mothers advise their daughter on the need to eat plenty of Ugwu vegetable? I have several times. The reason behind this is because the leaf is loaded with iron, a mineral that is key to improve your blood production level especially during and after menstrual cycle.

ugwu juice

In this article, I will be sharing with you in about few steps how you can make a healthy vegetable juice out of your pumpkin leaf.

Equipment needed for making Ugwu Juice

  • A blender or food processor
  • A sieve or muslin cloth
  • Ingredients
  • Ugwu leaves (Pumpkin)
  • A tin of evaporated milk or a bottle of malt drink or both using half quantity apiece.
  • One Orange

Method Of Preparation

The making of this juice is so easy such that it will take you less than 20 minutes to reach your end product. Check out the steps below.

  • Get your hands properly cleaned to avoid contamination.
  • Ensure you properly rinse the entire ugwu leaves to remove all debris and insects crippling on it. Do this process twice. You do not need to slice the ugwu.
  • Pour the ugwu leaves into the blender.
  • Add some quantity of water and blend with high speed until smooth. This could take up to five minutes depending on your blender.
  • Drain the juice using a sieve or muslin cloth
  • Put the solution to boil for between 90-120 seconds so that more vitamins become released. Let the solution cool off lightly.
  • Add the entire tin of evaporated milk or malt bottle drink or add half quantity of both into the solution.
  • Squeeze the orange into the solution. This is completely optional. Your Ugwu vegetable juice is ready to be served.

While this might not be sweet to taste, it is rich in plenty nutrients that are good to replenish your body. If you must make this juice sweet to your taste, you could had a cup of pineapple juice extract but ensure you do not over dilute the solution to much. For me, I love it without the pineapple. Men are particularly advised to take this before or after intercourse.

Do not forget to share your comments when you have tried this recipe.

ALSO SEE: Nutritional Benefits Of Eating Ugwu (Pumpkin Leaf)

Categories
Food Recipes

Video: How To Make Low Carb Meat Pizza by MuscleFood

In a post published on FoodsNG recently, we informed you about this new type of Pizza made by Musclefood that helps in busting fat. It is a low carbohydrate and high protein Pizza that still contains many of the ingredients you would find in a regular Pizza.

There are ingredients such as beef, chicken, mushrooms, flour, pepper, etc in the Pizza mentioned in the post linked to above. This video we are sharing below shows you how to make one of such Pizza that is low in carbohydrate. You would see for yourself that the title of the video is “Musclefood teach you how to make a low carb meat pizza”.

Watch the video on how to make the Pizza below

If you try it out, please share your experience with everyone here!

Categories
Food & Nutrition Food Recipes

Beans & Corn (Adalu): How To Cook This Balanced Diet

A balanced diet within appropriate quantity  is what has help many to stay quite healthy while others are battling with many conditions. Clearly, based on a simple questioning I carried out, a lot of people are of the opinion that a balanced diet is usually expensive to prepare. Far from it, you can eat a well balanced diet from your everyday food supplies without breaking the bank.

Beans and corn (locally called Adalu in Nigeria), is one combination of food that can provide you a balanced diet without hassles.  While it appears like a meal of only protein and carbohydrate, other macro and micro nutrients which constitute a balanced diet are all present. I had never looked deep enough into this meal until recently when my mum came visiting and cooked the meal for me. It tastes so delicious, its been more than 2 years that I had a taste of the meal.

cooked adalu maize and beans

What Is A Balanced Diet?

This is a meal which contain the right amount of all the food groups which have the ability to supply adequate energy and nutrition to the body for growth, repair and development. The bolded words are very key. Too much of healthy food may no longer be healthy. It is essential to get adequate amount.

Why Is Beans & Corn (Adalu) A Balanced Diet?

The major food groups are protein, carbohydrates and fat which fall into macro nutrients and vitamins and minerals which fall into micro nutrients. For your food to be balance, it must contain all of these nutrients in the right proportion with the macro nutrients taking most of the portions.

The beans will be supplying adequate amount of primary protein while the corn will supply carbohydrates and fibre. You will remember clearly that the meal is prepared with pepper including tomatoes supplying vitamins and minerals while palm oil is  providing some amount of fats. One thing mum does to make her beans and corn a delight is to slice up to two big bulbs of onions to a six servings of the meal. Onions is loaded with plenty anti oxidants and vitamins.

RECOMMENDED: 3 Tricks That I Use To Cut/Dice Onion Without Crying

How To Make This Beans & Corn Porridge

Mum does it in a very simple way and it turns out very well. Get your corn, usually more than the beans. Wash properly and cook until it is almost ready to be consumed and keep. Wash your beans and pour into a pot containing boiling water, slice one or two  big bulbs of onions into it. Cook for over an hour depending on the variety of the beans. When it is soft, pour your per boiled corn and cook for another 20 minutes. Add palm oil, salt and blended pepper as appropriate and cook for another five minutes. Your beans and corn porridge (called Agbado ati ewa by the Yorubas and generally Adalu)  is ready.

Meals like these are fast going into extinction particularly among young breeds. We prefer to choose other foods options many of which are processed foods that do not seem to supply adequate amount of nutrients. Try to give this meal called Adalu a trial on a Sunday evening. I bet you would love it.

ALSO SEE: How To Cook Beans To Avoid Passing Out Gas After Eating

Categories
Smoothies

How To Make This Healthy Delicious Fruit Smoothie

There are many fruit smoothies all around but it does seem that many Nigerians do not find fruit smoothies as a healthy way to start their day. Certain people are used to consuming heavy high calorie foods like yam, rice and potatoes as breakfast while smoothies of different types exist for them to explore.

One of the best ways to kick start your day is to consume a light and healthy food usually in liquid or pureed consistency. In view of this I have decided to share with you a fruit smoothie that both children and adult will find delicious whether as breakfast or as snacks.

banana tangerine milk smoothie

Making A Healthy & Very Tasteful Fruit Smoothie

Yes, this smoothie looks very inviting and things you need to make it are very cheap and easy to come by. Just follow the rest of this post to make something like this for yourself.

Ingredients for making the Smoothie

  • One big size apple
  • Two fingers of banana
  • Water (To your preferred consistency)
  • Two oranges or tangerines
  • One sachet of Milk 25gram

Equipment

  • A blender

Method Of Preparation

Clearly, the step by step method of making this smoothie is so simple.  Thanks to my powerful blender that helps produce smoothies of creamy consistencies.

  • Wash your hands clean and also your fruits. Do not spare the blender. You do not want to battle with food contamination.
  • Dice your apple into smaller pieces for ease of blending and keep aside.
  • Peel and dice the bananas and keep aside.
  • Peel the oranges using your hands. This time you do not only need the juice but you also need the fibre. Usually, I prefer tangerines. Try as much as possible to remove all the seeds except you bought seedless variety.
  • Pour all the prepared fruits into the blender and add water based on your prefer thickness or consistency. Actually, I love mine slightly thick. Do not forget to add the 25g of milk.
  • Blend at both high speed and low speed until a creamy solution is made. Hey, your heathy fruit smoothie is ready.

I hope you will find this lovely. This is the way I make my smoothie. You could be adventurous with this recipe by adding a few carrots to increase the fibre content. But for every added fruit, you might want to add one more finger of banana. Anyways, the choice is all yours based on your preference. I definitely love bananas.Hey do not forget to place the whole mixture in the fridge to make it chill.

By my estimation, this smoothies is about 500kcal. It can be served for two people during breakfast or mid snack supplying an average of 250kcal of healthy food.

Trying to lose some pounds of flesh? This is a great way to start your day – low calorie, yet filling and highly nutritious to the body. Do give it a try.

Categories
Food Recipes

Learn The Quick Way To Make Chapman At Home

It is always satisfying to know even to well wishers that the drinks served on your birthday or cocktail party was actually made by you. Apart from being cost effective, it gives you the opportunity to be adventurous and come up with something special that your invitees will find refreshing. Such is the case of making and serving chapman on your ceremony.

Chapman can be simply described as an easy cocktail drink which can be alcoholic or non alcoholic with a lot of fruits flavour. In fact, presently in Nigeria, it is gradually taking over other drinks as many people can not stop ordering for the fruity drink especially if made the Nigerian way.  One other good thing about this drink is that majority of the ingredients or constituents can be gotten in any nearby supermart store. Follow this article carefully and you are on your way to entertain your guest with chapman

How To Make Chapman (Drink) By Yourself

Ingredients and Utensils

  • A bottle of Fanta and a  bottle of Sprite.
  • Angostura Bitters and Grenadine syrup.
  • Orange (2 or 3)and Lime (lime is optional).
  • 1 big sized Cucumber or 2 small ones.
  • A big jug and 4 glass cups.
  • Some ice cubes

chapman ingredients

Note: This is a recipe for four (4) and in order for you to have a smooth ride in its preparation, some certain processes must have been carried out prior to kick starting.

1) Usually, there are ice cube trays in your refrigerator. Fill them up with water as much as you can and keep in the freezer to make your ice cubes.

2) Keep both the Fanta and Sprite in the refrigerator. Remember, chapman must be served chilled.

3) Dice your cucumber into pieces, keeping them in circular form, semi circular or triangular forms as you would love it. Do same to one of the oranges and keep the other ones to be squeezed into the drink. You do not need to peel the oranges.

Now Let Us Make The Chapman

1) Pour a cup of grenadine syrup into the jug ( About 20-25cl)

2) Add both bottles of Sprite and Fanta soft drink.

3) Add some dashes of Angostura bitters equivalent to about 3 table spoons and stir. I have also heard of people using Alomo bitters instead of Angostura bitters. Although, I have never tried using it. Remember, do not indulge children in Angostura bitters added chapman. Black currant can be used instead to make the non alcoholic type of chapman but it would not produce the real chapman taste

4) Cut the other oranges into halves and squeeze into the mixture.

5) Portion out the mixture into the four glass cups to about 2/3 full in order to give room for the next added ingredients.

6) Add the diced oranges and cucumber into the different cups.

7) On the last note, add some cubes of ice to each of the cups to further make it go chilled. Your chapman is ready to be served.

chapman drink

Seven straight steps to making your chapman. So simple. Please remember, the consumption of chapman should not be excessive because it is usually loaded with high amount of sugar considering the ingredients of making it.

Do not forget to share your comments once you have tried out this recipe or your own method of making chapman.

ALSO SEE: How To Make Your Own Zobo Drink At Home

Categories
Food Recipes

Learn How To Make Soy Milk At Home

In these past few years of my experience as a practicing Nutritionist, I have been opportune to meet a few patients that are lactose intolerant. Those that are lactose intolerant do not have the ability to digest the sugar lactose found in milk and some milk products thereby leading to bloating (accumulation of gas in the stomach), diarrhea and other symptoms. This is usually due to a lack of lactase enzyme produced in the small intestine. As they avoid this important food, they tend to lose a lot of nutritional benefits. In view of this, there is a need for them to consume milk substitutes that do not trigger any intolerance but supply good nutrients to the body. A typical example is Soy milk, a plant-based source of milk that does not contain lactose and so it cannot lead to intolerances.

Method To Make Your Own Soy Milk

Soy milk is quite available in many grocery stores but most of the processed soy milk have higher amounts of food additives that could trigger some health conditions. It is essential and cost-effective to learn how to make this milk substitute at home.

Soy Milk

Ingredients:

  • Soy Beans (150 g) to make 1littre of Soy milk.
  • A pinch of salt (optional)
  • Water (as appropriate)

Equipment

  • A blender; Kenwood or Philips
  • Muslin cloth
  • 1 Sieve and 2-3 bowls
  • A  measuring cup

Method:

Have you hands properly cleaned before touch the food item. Do not forget to make sure your equipment are clean too.

  • Grab the 150gram Soya beans and pour into a big bowl.
  • Add enough quantity of portable water to cover the beans well enough to give room for swelling.
  • Keep the mixture for about 8 hours or overnight. By that time, you would have noticed the beans had doubled or tripled in size.
  • Drain the water away using a sieve or carefully pour the water away.
  • Prepare and add hot water at 6O°C to the beans. It will help soften the hull of the beans so that it can be easily removed by hand rubbing and help inhibit further enzyme activities just after the soaking.
  • Rub the beans between your hands to take away the hull or skin just like you would do to beans in the making of Moimoi and Akara until it is completely done.
  • Carefully remove the hull by washing with water again and again until it remains the de hulled soy beans. Usually the hull will rise to the top.
  • Pour the entire Soya beans into a blender and add 1 litre of portable water.
  • Blend for like five minutes and pour into a bowl. Ensure the solution is smooth.

Using another bowl, place a muslin cloth over it and pour the solution into it in order to sieve out only the soy milk. You could use you hands to squeeze further to get more of the milk. The insoluble substance gotten here is called Okara and can be used as cattle feed.

Once you have completely achieved this, the solution can be placed on cooker to simmer slightly. Make sure it is on low it for 15 to 20 minutes. This will make the soy milk completely fit for consumption. During this period, a thick sheet of the soy solution might appear on the top, use a spoon to scrape it off. You do not need to cover the pot in this process.

Allow to cool and finally pour the solution into a sieve placed over another bowl to get the final soy milk with no sediment or beans particle.

Your healthy soy milk is ready for consumption. To enjoy it, you could add a pinch of salt and sugar to taste and  keep it in the refrigerator. But these are completely optional. However, you might prefer flavouring it this way.

PLEASE NOTE: While soy milk contains no lactose and no form the symptoms of lactose intolerance could occur, it is important that people who chose soy milk as a substitute should gradually include it into their diets until their system completely adjust to it.

I should also add that people that cannot digest lactose can go for other processed milk options such as Yoghurt. Lactose in milk has been converted to lactic acid in yoghurt. It is a good option too.

Categories
Food Recipes

Learn How To Make “Ice Cream” From 1 Ingredient At Home

As a nutritionist for children with special needs, one of my job responsibilities is to come up with new food varieties and recipes that will be appealing to our children. Sometimes it can be quite difficult but the nutrition team which I belong to, tries its best. Some times last year we decided to give a new look to the mid-day food of our children at the centre. Then, we decided to make Ice cream.

Banana Ice Cream Recipe
Photo: imsa.edu

As at that time we had no Ice cream equipment and other important ingredients necessary for the making of Ice cream. As we pondered, one of us sighted at a food item and he said we could make a healthy nutritious Ice cream from it. If your guess is as good as mine…….then by now you should know the food item – Banana. Yes, you can make Ice cream from start to finish using BANANA only. Although, the procedure is simple and a bit different but the output is as creamy as your ice cream made from milk and other ingredients.

How Is Iced Banana Cream Made? – Ingredients and Method

Ingredients, Equipments and Method of Preparation!

INGREDIENT

Medium sized ripe banana (Two fingers)

EQUIPMENT

A powerful blender or a food processor. I usually use Kenwood Food processor.

METHOD OF PREPARATION

Wash your hand clean and keep them dry before handling the food item to avoid contamination.

  • Ensure that the blender or food processor is clean.
  • Peel the 2 banana fingers and slice each to six or seven pieces. A straight horizontal cutting will do.
  • Pour the sliced banana into a small glass container that has a lid. Cover it up.
  • Place in a freezer for about three hours if you are using a blender but over night if using a food processor.
  • When ready collect the already frozen banana and pour inside your food processor.

Turn on at high speed for about 30 seconds. Stop, scrape the banana to fall into place and start the engine again. Do this continuously until the banana turns completely creamy just like your ice cream. This process could take up to five minutes, less or more depending on your processing device. The colour of the cream may appear brownish depending on you banana.

Your Banana Ice Cream or better still, Iced Banana Cream is Ready.

One good and healthy thing about this recipe is that banana contains most of the other ingredients that regular ice cream contains. Banana contains sugar and pectin that keep it creamy and fibre to aid in proper digestion. You can also decide to add other ingredients to it if you so wish.

Milk, Peanut butter or Nutella chocolates will not be bad. Just add at moderate quantity. I do not advise adding sugar because Banana is already high in sugar.

Do not forget to give this a shot and share your comments here!

Categories
Food Recipes

Learn How To Make Oha Soup (Recipe)

I am a lover of soups and everyone around me knows that. Each time I visit a new environment, all I ask about on entering any of their restaurants is the different types of soups available and I opt for those I have not eaten before. Sometimes I get disappointed but most times I am elated especially when I am in the eastern part of Nigeria.

I have to give the credit of this article to a friend Miss Patience Chieme who was willing to share with me the recipe for this soup. When I tasted the soup the very first time, I knew only few Nigerian soups can compete with this in terms of taste, colour and expected nutritional value. It will also interest you to know that the leaves of Oha do not lose their nutritional and photochemical properties easily during preparation. Let’s look straight into how this delicious soup can be made.

oha soup

What are the ingredients to make Oha soup?

  • Beef (700g), stock fish (500g), blackfish (300g) and grained crayfish (As appropriate). Remember, you can increase the quantity of protein source to be used based on your family’s size)
  • Water, Palm oil ( Add as appropriate)
  • Black Pepper and onions ( Add as you would prefer)
  • Cocoyam (6 small corms) or Achi and Oha leaves
  • Seasonings and Salt

Pre-cooking Direction

  • Ensure you wash your hands properly to avoid external contamination.
  • Grind onions with a hand grater and set aside.
  • Also grind crayfish and black pepper together and set aside.
  • Wash and boil the cocoyam corms until it is completely soft and remove the peels and use a mortar and pestle to pound the corms to a smooth paste. Some people have also used blender to achieve similar result.
  • If cocoyam is not available. Achi can be used. It is commonly sold among Ibo foods sellers. It will also act as thickener. Few table spoons will be dissolved in little water to form a paste. This can be done at that point when it is to be added
  • Use your fingers to pick the Oha leaves, wash them properly and cut the (Oha) leaves into tiny pieces using your hands and keep aside. Although, there is report that if you use knife to dice the leaves, the soup will turn bitter but a friend of mine who tried both methods did not notice any significant difference talk less of bitter taste. But hey, to stand on the safe side, use your hands…..it is quite easy.

NOTE: DO NOT FORGET TO PROPERLY WASH ALL THE INGREDIENTS BEFORE COOKING.

Now Let’s Check How The Soup Is Prepared

  • Put water in a pot and place on cooker.
  • Add meat and blended onion. Allow to cook until almost tender.
  • Add your stock fish, black fish, (and any other protein you wish to have in the soup).
  • Allow to cook to your own taste of tenderness.
  • When it has cooked properly add Palm oil allow to cook up to 3 minutes.
  • Add your blended crayfish, black paper, and allow to cook up before adding salt to taste. Cook for another few minutes.
  • Add the blended/ pounded cocoyam paste or Achi that had been dissolved in ordinary water to thicken the soup. Ensure you stir to avoid sticking to the pot. Cook for few minutes.
  • Add cube seasonings to taste plus Ogiri (optional but it adds a lot traditional flavour to the soup).
  • When it has properly cooked, add your Oha leaf (Remember, the Oha leaf is chopped with hands not knife) and after 1 or 2 minutes your Oha soup is ready. Ensure the leaf retains its greenness.
  • Serve with any solid food (Wheat, Semolina, Pounded yam, Eba, and Fufu).

Oha soup is native to the eastern part of Nigeria. Just give this recipe a try and you are on your way to making the delicious soup and you will love it. Do not forget to share if you tried it or share your own way of making Oha Soup.

#ILOVENAIJAFOODS

Categories
Food Recipes

Simple Method For Making Peanut Butter At Home

I am really glad to share this article with you because I have made peanut butter countless times as it is used regularly at my place of work for therapeutic purposes. It will interest you to know how simple this product can be made at home using readily available kitchen equipment. Without doubt, most lovers of peanut and peanut butter are certainly not aware of the savings they can make by making their own peanut butter.

In this short post, I will be sharing with you step by step method to follow in order to arrive at your own homemade creamy peanut butter. I am certain you will enjoy it with fresh slices of bread…Hmmmm yummy. Now let’s proceed.

Ingredients for Peanut Butter

  • One bottle of peanut or groundnut
  • Salt (Optional)
  • Vegetable oil
  • Cocoa powder (Optional)

peanut butter
Photo Credit: peanutbutterlovers.com

Equipment Needed

  • A powerful blender or Food processor

Method

  • Pour the entire well peeled roasted groundnut or peanut into the blender. If your blender cannot contain it, process the peanut in 2 batches.
  • Start the blender at high speed and blend for about 1 minute. Stop and start the blender again until the groundnut had completely turned into crumbs while producing little oil. Do not use you blender continuously for more than a minute it could damage the motor.
  • Add two table spoons of vegetable oil. This is because some groundnuts do not contain enough oil to make the peanut butter creamy. So you can adjust the quantity of added vegetable oil from one table spoon to four table spoons depending on the oil production level of the groundnut.
  • Stop the blender and add a pinch of salt. This is clearly optional since most groundnuts had been well salted.
  • Continue blending at high speed while occasionally changing to low speed. Do this for about a minute or two. Watch the peanut if it had completely turned creamy or puree like.
  • Stop the blender and scoop out the peanut butter into a jar or plastic container.
  • Depending on your taste, you can decide to add a tea spoon of cocoa powder or a table spoon. This will change the colour of the peanut butter from light brown to dark brown.
  • Keep in the refrigerator to solidify slightly.
  • Your peanut butter is ready.

One thing I love about this homemade peanut butter is that you can determine the ingredients to add and their quantities which make it quite unique and healthy unlike the processed ones sold in the grocery stores that one cannot ascertain the quantities of ingredients added.

Note that you cannot get your homemade peanut butter to be as creamier as the factory made ones but they would not be bad on slices of bread. It is cost effective and you could also use the opportunity to teach your children.

ALSO SEE: Peanut allergies with associated dangers and nutritional benefits.

Categories
Food Recipes

Simple Way To Make Nigerian Kunun Zaki At Home

Kunun is a traditional beverage drink produced from cereal grains such as Sorghum, Millet and Corn.Some people even use rice to make Kunun but I believe it does not make any sense if what you intend to do is sell. How would you make profit out of that? Rice is not cheap in this part of the world. Kunun is mostly consumed in the northern part of Nigeria where these cereals are majorly cultivated.

As I write this article, I can remember how we used to keep some money in our secondary school days to buy cold Kunun zaki after school hours and drink with straw as we walk home. I still love it till today but I was always scared of buying it because I was not sure of the production hygiene. Now, I make it easily whenever I need it. I store in the refrigerator for days too.

kunun zakiActually, there are different types of Kunun that exists; they are four (4) in number;

  1. Kunun Tsamiya
  2. Kunun Zaki
  3. Kunun Gyada
  4. Kunun Kanwa

About Kunun zaki and How To Make It

The most common one that we see around and buy is the Kunun zaki, I can confirm that to us. I am still trying to investigate the difference between these “Kununs” and feed you back once I get something meaningful. My guess is that they are names after the type of cereal being used. Kunun zaki is a non-alcoholic drink. It is served as a refreshing drink in homes and some social gatherings.

Ingredients & Material Needed

  • Grains (millet, sorghum or maize)
  • Spices (cloves, black pepper, red pepper, ginger)
  • Sugar (to taste)
  • Blender or mill
  • Sieves
  • Bottles and crown corks

How to prepare it

  • Take 4 cups of the grain you decide to use for the Kunun and put in a bowl of water (use grains with hulls removed)
  • Leave the grains inside the water for 12hours and discard the water. Some say they use 24 hours but I prefer this so that the maize does not start to ferment or grow.
  • Put the grains and all the spices in a blender, blend into a very smooth puree
  • Sieve the resultant puree and throw away the shaft left. You may add some water to make sieving easier.
  • You should now leave this smooth puree for some hours to settle. After this, throw away the water over the settled puree or slurry.
  • Divide the mixture into two parts (Part one should be two thirds of the mixture, and the other part, one third of it).
  • To the first part, add a small quantity of water, then add boiling water in a ratio of 4 cups of water to 1 part of the slurry. The hot water will make the slurry become a little gelatinized.
  • Mix the second part with cold water in a ratio of 3 cups of water to 1 part of slurry and add this to the first part above.
  • You should now mix these two parts together with your sugar (to taste) to get your sweetened Kunun zaki.

Kunun zaki is usually enjoyed cold, therefore, you may want to divide into bottles, cover with crown corks and store inside the refrigerator.

Categories
Food Recipes

OnionEgg Recipe: See How To Make This Nutritious Food

Hello friends, I have been postponing to share this article for about three weeks now because I felt it was too simple a recipe until I shared the idea with another food enthusiast who actually loved it completely. She went ahead to try it and she called to say it tastes great. In fact she had introduced it to her mum who is diabetic. In her words: “Guy, how you take think am, although very simple but it is great and healthy. I love it bro”. It was then I realized that the food recipe I stumbled upon as a result of my curiosity in trying new things is worth sharing with the public.

Many of you are used to frying eggs and adding few slices of onions but in this meal, onions would the food to fry while adding egg and any other ingredient that you love to have in a meal like this.

onion eggs recipe

What Is Onion Egg or Onionegg?

Onionegg is a type of food that majorly consists of onions and egg. I guess you are saying; “what exactly is special about it? Whenever I fry my eggs, I add slices of onion”. Yes, you are absolutely correct but the method of preparation is slightly different. Before I share with you the method, I will like to briefly share the health benefits associated with this meal.

What Onions Do To Your Body

  • Onion helps to control glucose level which is quite important for diabetes patients
  • It is loaded with numerous anti-oxidants that fight off cancer causing agents.
  • It also contains significant amount of vitamin C that helps to improve the immune system
  • The bulbous plant also helps in proper digestion and prevents against stomach ulcer.

What Eggs Do To Your Body

  • It contains high amount of protein which is important for repair of tissues in our body.
  • It also contain a substantial amount of Omega 3 fatty acid which helps in proper brain function and weight management. It was included in this post that listed foods that help you get sharper memory.

In this article, I am not writing on the health benefit of onions and eggs else, I would have highlighted many benefits. You can check related posts on this blog. Let’s move on to the making of Onionegg.

How To Make Onionegg (Recipe)

Ingredients

  • A large size onion bulb or two smaller sizes.
  • One egg
  • Salt(put to taste)
  • Pepper( optional)
  • Cray fish( optional)

Method

  • Peel your onions and wash them
  • Cut them into five or six pieces and grate them or blend them till you get a pasty form. A blender is better.
  • Add your egg to the blended or grated onions and whisk properly. The blended onions have to be at least twice the quantity of added egg.
  • Add other ingredients like salt, crayfish and pepper; then whisk properly until smooth.
  • Place frying pan on cooker and add small amount of any healthy oil that you have. I used coconut oil.
  • At frying point, add your mixture and fry the way you would prefer. Onionegg is ready.

You would realize that the simple difference is the large size of onion used. The main food here is onions. This recipe is for one serving. You can give it a try particularly if you are a lover of onions like me, you will be glad you did.

ALSO SEE: 3 Tricks That I Use To Cut/Dice Onion Without Crying

Remember this is healthy and do not forget to share.

Categories
Food Recipes

How To Make Afang Soup The Akwa Ibom Way (Recipe)

On the 8th of March 2011, clarion call took me to Akwa Ibom shortly after I graduated from the University. As soon as I received my posting letter and I saw Akwa ibom, I knew I was in for food adventure. Indeed, my expectation was met during my one year compulsory sojourn. This is how my romance with the soup started; now I can talk and even give people Afang Soup recipe as I picked it from Akwa Ibom.

The night I arrived the beautiful city of Uyo the capital of Akwa Ibom, I was completely exhausted and hungry….So, I had to visit the restaurant. My first meal was Afang soup plus Garri (Eba). I had not tasted the soup before and I decided to give it a shot since it had always being talked about as a super soup by many who have been opportune to have a bite. As it was served, not only did the soup look so attractive, it also smelled great. With enthusiasm, I took the first bolus of Eba with the soup. It took me by surprise. Delicious was an understatement.

Photo Credit: avartsycooking.comAs a young man who had lived his entire life majorly in Yorubaland, none of their soups taste this great. As stay with the indigenes during my service year, I did learn the nitty-gritty of how the soup is prepared to taste the Akwa Ibom way. Follow the recipe and all included below and your highly nutritious Afang soup is ready.

Ingredients For Cooking Afang Soup

  • About 1kg of goat meat, 0.5kg of Stock Fish and 2 big African snails (Optional)
  • Half tin cup of Cray fish, Seasoning cubes, preferably Knorr (To make it tasty)
  • Pepper, Yellow pepper and Salt
  • Small amount of beef (optional), dry fish, 250g of kpomo (Cow skin), Onions (1-2 bulbs depending on size) and periwinkle.
  • Water as needed.
  • Finally, Water leaves and Afang leaves as appropriate.

Pre-cooking Steps Involved In Cooking Afang Soup

Step 1: Wash properly the goat meat, beef, kpomo, snail (with lime or potash), stock fish ( in salty hot water for few minutes). Keep the goat meat, beef, kpomo and snail meat in a cooking pot after they had been washed properly.

Step 2: Wash, drain and slice the Water leaves and Afang leaves. The sliced Afang leafs has to be grinded.

Step 3: In a separate bowl, wash and dice onions and some pepper.

Important Note: Do not forget to properly wash your hands before handling the food items.

How To Prepare The Popular Afang Soup

The following steps will guide you in preparing the Afang soup the way people of Akwa Ibom state prepare it.

  • Place the washed meats in step 1 above on low heat and cook until the meats are tender. Do not forget to add adequate amount of water, diced onions, pepper and salt. After the meats are tender, add the washed stock fish and cook for about a minutes or two. Ensure you have enough stock water.
  • Add palm oil and allow to boil for two minutes.
  • Add the diced water leaves and allow to cook for about 3 minutes
  • Add other ingredients like Maggi (seasoning), crayfish and periwinkle and allow to boil before adding the Afang leaves. Taste the soup to know if there is need to add more salts. Allow to cook for about 3 minutes. Ensure the leaves still possess the greenness.

Your Afang soup is ready to be served.

Afang soup has medicinal purposes for sore throats, nausea and loss of appetite It is a rich source of vitamins with loaded essential and non- essential amino acids. It also has anti- inflammatory and anti-oxidant properties. Go ahead and go give it a try.

Categories
Food Recipes

How to Prepare Ewedu Soup (Recipe)

This recipe for Ewedu soup is more like a sequel to my post on the health benefits of Ewedu. It was going to be a part of the post until I spoke with a friend who suggested I could treat the Ewedu recipe as a separate subject on its own. He was right, this is a topic that should be talked about on its own because of this believe an appreciable number of people have about Ewedu.

Preparing Ewedu And What Some People Believe

Just like my 36 year old client perceived Ewedu as a difficult vegetable to prepare, a handful of people seem to believe same. Far from it, it is clearly simple to prepare. Follow the simple steps below and you are good to go.

Ewedu Amala and Gbegiri
Photo Credit: 9jaFoodie

Ingredients For Cooking Ewedu Soup

The following are what you need to cook Ewedu soup. Some of these are optional as you do not need to add them to get the perfect Ewedu that draws and produce the attractive green colour we love.

  • Ewedu leaves
  • A dash of potash (Optional)
  • Locust beans (Optional )
  • Cray fish (Optional )
  • Salt
  • Water (Depending on the quantity of Ewedu you want to cook)

Step by Step Method of Preparing Ewedu

The following are the steps involved in cooking one of the most famous draw soups in Nigeria – Ewedu.

  • Ensure you pick your Ewedu leaves properly, wash the picked leaves with clean water and drain the water.
  • Add water to your cooking pot and place on cooker (Low heat)
  • Add a dash of potash to the water to help soften the leaves.
  • As the water boils up under low heat, add your Ewedu leaves
  • Cook for about 10 minutes to 15 minutes. Avoid colour discolouration.
  • Take it off the fire and use a blender or broom to whisk it.
  • After it had been properly whisked, place back on cooker, add a pinch of salt, locust bean and crayfish as you would prefer.
  • Cook for a minute or two….YOUR EWEDU IS DONE AND READY TO BE SERVED.

ALSO SEE: Numerous Health Benefits of Ewedu You Don’t Know

That is how to prepare Ewedu soup and of course, you can be adventurous with your method of cooking Ewedu and I am certain you and your family will love it. Do not forget to share this article.