Categories
Food Processing

Solution For Yams Turning Yellow, Brown When Peeling

Without doubts, I have also been bothered by this scenario each time I find myself in the kitchen to cook Yam. It was always dissatisfying noticing the discolouration that suddenly happens under my very eyes within seconds (they turn yellow, brown and sometimes black). Yam had been a major staple for centuries providing energy and other nutrients for the African people and beyond.

With its more than 600 documented species; edible and inedible, it remains a difficult task to identify which one would turn yellow, dotted green, brown or black during peeling.

Popular species of yam include Dioscorea alata (Water yam), Dioscorea rotundata (White Yam) and Dioscorea bulbifera (Aerial Yam). Many mothers and women have been forced to opt for other tubers or avoid yam in their diet because of this sudden reaction. Before writing this piece, I took the time to carry out a simple finding by speaking with mummies and grand mummies on the best ways to avoid discolouration of Yam during preparation and all the women gave their opinions about it. Quickly let’s check some of their advice.

"Photo

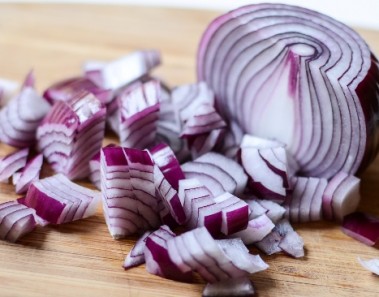
Advice: Preventing Yam From Changing Colour While Peeling, Cutting

1. A few of the women said the best way to avoid yam discolouration during peeling is to “shine your eye well” when buying. They insisted some Yam types are naturally coloured and so there is nothing you can do to avoid obtaining a coloured yam. An example is a yellow yam with botanical name Dioscorea cayenensis which is a result of carotenoid in it. Try to peel the yam slightly with your finger and see if any discolouration quickly occurred when you are still at the market. If it does do not buy the Yam. It is best to buy only white yam.

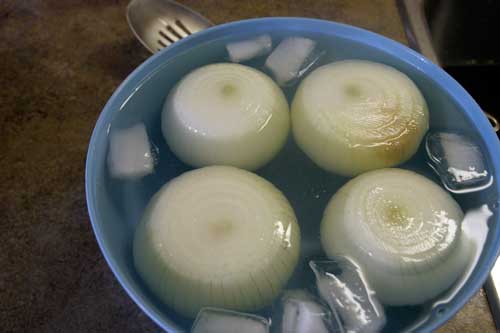
2. The common one that more than 70% of them subscribed to is peeling the yam and submerging quickly underwater immediately. Some of them said they go further to peel the Yams beneath the water. I am aware that once yam is peeled and exposed to air, it is bound to undergo oxidation which causes discolouration. This, however, depends on the specie of the yam as some species do not change colour rapidly on exposure to air. White Yam remain same after exposure to hear

3. Some of the women then insisted that over the years they do not bother keeping their yams in store to be prepared when they want to eat it. They went further to say that once they had purchased the Yams, on getting home; they slice and peel off the entire yam tubers, quickly cut them into sizable portions under water, place them in a plastic container and keep them in the refrigerator to be picked whenever needed. They said keeping Yam tubers on bare floors and staying longer period before consumption may affect their colouration when peeled. Those fresh yams do not discolour like others that have stayed longer periods in storage. There is no scientific proof to this but if you do not mind, give it a try, it does not hurt.

When you look at the second opinion scientifically, I would opine that it really makes sense and it’s something I have tried myself too – it works but not 100% most times. There are times that the discolouration would just be mild but remains white at other times.

Yams contain enzymes that, on exposure to atmospheric oxygen react to give a brown colouration. When you immediately put yam underwater after peeling, you minimize the exposure time for this reaction. I have used warm water with great success.

You may want to ask, “What is different with warm water?” Let me tell you how using warm water has a place in science – oxygen dissolves in water and the amount of dissolved oxygen that the water can hold depends on the temperature and salinity of the water (how much salt there in the water). Coldwater can hold more dissolved oxygen than warm water and freshwater can hold more dissolved oxygen than saltwater.

I am certain a reasonable number of you would have other methods you practice to avoid yam discolouration. Do not hesitate to share those ideas. Thank you!

ALSO SEE: Prevent Your Cut, Leftover Yam From Growing Mould

You should subscribe to our FREE updates if you don’t want to miss any of this information!!!

Categories
Food & Body

What Are The Foods That Trigger Pimples & Acne?

A lot of people battle with pimples and acne during and shortly after puberty while some others experience it throughout the teenage years. Throughout these periods of my life, I did not have pimples and acne anywhere on my face and body. I always pride myself on that because my face was always clear and clean. I thought this would continue like that forever but I was wrong – I would later have my own fair share of pimples later on.

What Are Pimples And Acne? Any Differences?

One of our readers sent a message to ask if the food they eat could cause acne or pimples and we will try to address that. Many people don’t even know the differences between pimples and acne. Someone even told me that pimples show on black peoples’ skin while acne only comes out on white peoples’ skin. I will try as much as possible not to dwell too much on these because the purpose of this post is how some foods lead to the onset of acne and pimples on our skin. Yes, food can trigger pimples.

acne pimples skin

Acne is the inflammation of the skin in which the secreted sebum gets collected in the pores of the skin and remains there. This causes the skin to swell up in the form of a breakout. Acne will most likely have a white head (not in every case) and is painful to touch. If it is a pimple, it would normally not be painful unless it is too severe.

So, What Are Those Foods That Can Set Off Pimples?

To continue with my story, I started seeing pimples and acne on my skin in my early twenties and it lasted into mid-twenties. It was a nightmare because when they finally go, they turn into
black scars (not just spots). I started to think of the possible causes and one day I thought of my diet – could it be my eating habit?

What I have always read about foods as they affect your skin was that they do not cause pimples and acne. Something just told me to do a little more digging and I found out that several other pieces of research were already published telling us that there could be a relationship between diet and acne.

The truth of the matter, however, is that there has not been a definite link between any food (dairy especially) and acne, but there are several theories about it.

In an article written for a medical journal in 2008, F. William Danby, MD, a skin expert who promotes the possible dairy-acne connection, explained how the two may be related. Milk contains components related to the hormone testosterone that may stimulate oil glands in the skin, setting the stage for acne.

So, could we say Milk can cause acne? Some would say yes and some would say no, but I have read reports of people who saw all their pimples and acne disappear after stopping the consumption of Milk. The same happened to me too.

Some researchers have suggested that an imbalance in the level of insulin in the body may play a role in the onset of acne. They explain that some foods make your blood sugar quickly soar. This triggers your body to make a burst of the hormone insulin to help your cells absorb the sugar.

ADVICE: What I would advise is to monitor your own skin and diet and note what foods you are eating when the acne breakouts start coming out. This is because these foods (Milk, Chocolate, Cheese, etc.), that people are implicating in the development of acne have health benefits. When you monitor yourself and you notice that milk causes acne for you, you can try to cut down on it and see if you still have acne.

I would not ask you to stop consuming milk. Never! Milk is highly nutritious – containing several vitamins and minerals that are useful for the body. I would not be pointing fingers to any food. What you should do is to observe and adjust.

ALSO SEE: Differences Between Skimmed Milk and Full Cream Milk

Categories
Knowledgebase

Top 5 Foods That Make You Fart Asides Beans

At exactly 8:50am on Saturdays morning, I was still lying in bed. Not too long from that time, I heard a loud sound from my brother’s room – “Poooooooouu”. I had to rush to know what exactly happened because it was repeatedly loud. On getting there, he gave another loud “Poooouuuu”. It was then I knew my big brother was farting. Then I couldn’t but burst into laughter. I have been with him over the weekend and he had not consumed beans – since beans are popularly seen as the food that causes flatulence. But far from it, his farting was as a result of other foods he ate.

When he woke up, he did not waste time to ask me – “What is the cause of my farting? I have not been indulging in beans, yet I have been farting; he said. I replied him in pidgin – “Bros, No be only beans dey make person fart ooo” It was then I thought it will be necessary to share an article on flatulence on this page. Let’s quickly see what causes flatulence.

What is flatulence?

This is commonly known as farting. It is the exit of gas through the anal. When someone farts, it could bring about a level of laughter or complete embarrassment depending on the type of gathering you find yourself. Hey! Do not get caught up in any mess.

fart smells

What Causes Flatulence?

Flatulence is usually caused due to incomplete digestion process followed by fermentation. Food substances that are not absorbed in the human intestines accumulate in the colon, where they are fermented by bacteria, leading to production of gas. The smell of the gas depends on the foods eaten and the types of bacteria that acted on it while the sound is as a result of the outward forceful flow of air that makes anal tissues vibrate. Some people also lack specific enzymes needed to break down certain foods, which then get acted upon by bacteria and create gas. You can read more on the article on how to cook beans so that you don’t fart after eating them.

So, What Are The Top Five Other Foods That Cause Flatulence In People?

Before sharing the list of the foods, it is important to let you know that – what causes flatulence in Mr. A may be completely different from that of Mr. B. It is sometimes based on body types and intestinal structure of each individual. At the end of this article do no forget to share the food(s) that you have identified which make you fart.

Click on pages 2, 3, 4… below to go to pages containing the list of foods;

Categories
Food Recipes

Learn How To Make Oha Soup (Recipe)

I am a lover of soups and everyone around me knows that. Each time I visit a new environment, all I ask about on entering any of their restaurants is the different types of soups available and I opt for those I have not eaten before. Sometimes I get disappointed but most times I am elated especially when I am in the eastern part of Nigeria.

I have to give the credit of this article to a friend Miss Patience Chieme who was willing to share with me the recipe for this soup. When I tasted the soup the very first time, I knew only few Nigerian soups can compete with this in terms of taste, colour and expected nutritional value. It will also interest you to know that the leaves of Oha do not lose their nutritional and photochemical properties easily during preparation. Let’s look straight into how this delicious soup can be made.

oha soup

What are the ingredients to make Oha soup?

  • Beef (700g), stock fish (500g), blackfish (300g) and grained crayfish (As appropriate). Remember, you can increase the quantity of protein source to be used based on your family’s size)
  • Water, Palm oil ( Add as appropriate)
  • Black Pepper and onions ( Add as you would prefer)
  • Cocoyam (6 small corms) or Achi and Oha leaves
  • Seasonings and Salt

Pre-cooking Direction

  • Ensure you wash your hands properly to avoid external contamination.
  • Grind onions with a hand grater and set aside.
  • Also grind crayfish and black pepper together and set aside.
  • Wash and boil the cocoyam corms until it is completely soft and remove the peels and use a mortar and pestle to pound the corms to a smooth paste. Some people have also used blender to achieve similar result.
  • If cocoyam is not available. Achi can be used. It is commonly sold among Ibo foods sellers. It will also act as thickener. Few table spoons will be dissolved in little water to form a paste. This can be done at that point when it is to be added
  • Use your fingers to pick the Oha leaves, wash them properly and cut the (Oha) leaves into tiny pieces using your hands and keep aside. Although, there is report that if you use knife to dice the leaves, the soup will turn bitter but a friend of mine who tried both methods did not notice any significant difference talk less of bitter taste. But hey, to stand on the safe side, use your hands…..it is quite easy.

NOTE: DO NOT FORGET TO PROPERLY WASH ALL THE INGREDIENTS BEFORE COOKING.

Now Let’s Check How The Soup Is Prepared

  • Put water in a pot and place on cooker.
  • Add meat and blended onion. Allow to cook until almost tender.
  • Add your stock fish, black fish, (and any other protein you wish to have in the soup).
  • Allow to cook to your own taste of tenderness.
  • When it has cooked properly add Palm oil allow to cook up to 3 minutes.
  • Add your blended crayfish, black paper, and allow to cook up before adding salt to taste. Cook for another few minutes.
  • Add the blended/ pounded cocoyam paste or Achi that had been dissolved in ordinary water to thicken the soup. Ensure you stir to avoid sticking to the pot. Cook for few minutes.
  • Add cube seasonings to taste plus Ogiri (optional but it adds a lot traditional flavour to the soup).
  • When it has properly cooked, add your Oha leaf (Remember, the Oha leaf is chopped with hands not knife) and after 1 or 2 minutes your Oha soup is ready. Ensure the leaf retains its greenness.
  • Serve with any solid food (Wheat, Semolina, Pounded yam, Eba, and Fufu).

Oha soup is native to the eastern part of Nigeria. Just give this recipe a try and you are on your way to making the delicious soup and you will love it. Do not forget to share if you tried it or share your own way of making Oha Soup.

#ILOVENAIJAFOODS

Categories
Food & Nutrition

Garri, Fufu, Usi With Vitamin A: What You Need To Know!

Vitamin A fortified cassava products: expect this healthy option soon on your tableAs an undergraduate studying Food Science, I had always questioned why Cassava products especially Garri was only known for its starch content. Just as I pondered about it, I never knew research was already on going on the bio fortification of cassava with Vitamin A. Not too long after graduation, all I read in the pages of newspapers was the first release of cassava stems that had been fortified with Vitamin A via genetic engineering process. Elated I was. Finally, Cassava, our own most consumed food can have its place in competing with other staples in terms of nutritional content.

A Brief Description Of Cassava

Cassava is scientifically called Manihot esculenta is a staple crop common to hundreds of millions of people in Africa. It is the third largest source of carbohydrates after Rice and Maize. Nigeria is the largest producer of Cassava in the whole world while Thailand is the largest exporter. It will also interest you to know that Cassava can be classified into sweet and bitter types. Both contain anti nutritional compounds with more in bitter type. That’s why the job of cassava processing is carried out by experienced people to avoid carcinogenic reactions.

VitaCassava - Vitamin A fortified

Why Cassava Was Chosen For Fortification

Over the years many of us have consumed different processed products that had been fortified. Some include fortified salt with iodine, fortified flour with vitamin A and fortified milk with vitamin D. Clearly, this products fortified with different nutrients have not achieved the aim of reducing severe acute malnutrition as most of them are only consumed adequately in the urban communities leaving the rural communities with Cassava and Maize. Cassava was chosen because it is a staple consume majorly by rural communities where nutrient deficiency is highest. Fortifying a root tuber like cassava will actually make the goal of improving the health status of Africans improve as most of our meals come from cassava and yet only providing large chunk of carbohydrate with negligible amount of other nutrients. Some common Cassava foods are Eba, Fufu, lafu, Abacha and Usi.

Why We Should Support The Consumption Of Fortified Cassava Products

According to WHO Vitamin A deficiency (VAD) is the leading cause of preventable blindness in children and increases the risk of disease and death from severe infections. In pregnant women VAD causes night blindness and may increase the risk of maternal mortality. Vitamin A deficiency is a public health problem in more than half of all countries, especially in Africa and South-East Asia, hitting hardest young children and pregnant women in low- income countries. The body also states that an estimated 250 million preschool children are vitamin A deficient and it is likely that in vitamin A deficient areas a substantial proportion of pregnant women is vitamin A deficient. An estimated 250 000 to 500 000 vitamin A-deficient children become blind every year, half of them dying within 12 months of losing their sight. The need to fortify a major staple is necessary to reduce the prevalence of Vitamin A deficiency in Africa.

Which body carried out the research on cassava vitamin a fortification?

Vitamin A Cassava was bred by a conglomerate of partners, including International Institute of Tropical Agriculture (IITA), National Root Crops Research Institute (NRCRI), Umudike, and International Center for Tropical Agriculture (CIAT) with Harvestplus; an international organisation spearheading the project and released in Nigeria in December 2011.

Why Vitamin A Fortified Cassava Products Are Not Popular Yet

  • The production ability of the Vitamin A fortified cassava is still an issue as the white cassava ( Original type) yield between 30-35 metric tonnes per hectare of land while the yellow Cassava type ( Vitamin A fortified) yield between 20-24 metric tonnes per hectare. This is a serious concern for farmers due to low yields.
  • Some farmers love their cassava to stay in the ground for as long as they want usually between 12- 24 months after maturity but this new variant of cassava will rot after not harvested with 12 months. Farmers are clamouring for an improved variant that can make the specie compete with the convectional cassava tuber.
  • Asides the above mentioned reasons, regardless of how wonderful an idea or a product is, people’s mind set, especially rural dweller tend to be rigid. It will take a lot of sensitization and practical trainings for farmers and cassava processors to help eliminate any belief that has hindered them from trying the new variant of cassava which is healthier.

The Advantages Of Vitamin A Fortified Cassava Products

  • This is a novel development and I keep repeating to those who care to listen that children do not have to be blind because of lack of Vitamin A. Most of us do not believe this but a trip to rural community based missions to see how local people have been affected due to vitamin deficiency will shock you. With the proliferation of this variant cassava, all bye products of cassava would automatically have Vitamin A thereby nourishing the diets of children and women all around Africa and beyond. Through this initiative Vitamin A deficiency can be greatly reduced if not eradicated.
  • To processors and consumer, this variant of cassava is cost effective. This is because there is no need to buy gallons of palm oil to convert cassava products to yellow as seen in yellow Garri. Direct processing will produce yellow products which are not only attractive but reduces cost of processing.

So friends when you visit restaurants and request for Eba or Fufu and it turns out to be yellow in colour, do not attempt to reject it or call it “eba ibo”, it could be the Vitamin A fortified cassava that had led to the colour. You can simply ask if you do not like the ones made with palm oil. It is healthy and even tastes great based on the reports of the researchers. I have not been privilege to have a taste but if you had tasted it before, please share your comments and opinions on it as it will be appreciated.

#SUPPORT VITAMIN A FORTIFIED CASSAVA

Categories
Food Safety

How To Make Zobo Drink Yourself At Home

Yesterday, I shared information on how to make Kunun drink, today it is the turn of Zobo. Zobo drink or Zoborodo is a Nigerian beverage made from dried calyx of Hibiscus sabdariffa (from Roselle plant flowers). It is usually served chilled in places where they are consumed in Nigeria. Many people drink zobo only for its refreshing taste but do not know that it has some health benefits too.

Health Benefits of Zobo Drink

Not long ago, we talked about the need to remove toxic products from our body and made mention of foods that help detoxify the body. Zobo drink has been established to be a rich source of nutrients that activate detoxification. For example, it helps resolve metabolic syndrome in that it promotes the excretion of uric acid from the body. This is only of its benefits and I may consider writing its full health benefits as another post later but before then, let’s talk about how to make this drink.

Ingredients for Making Zobo Drink

People like their Zobo different ways, therefore, the ingredients might be slightly different from one processor to another. The differences in ingredients have effects on taste and flavour of the end product. However, there are still some ingredients you must use, irrespective of the flavour that you want in your Zobo drink.

These ingredients include;

2 cups of dry Zobo leaves
1 big piece of ginger
Potable water

Other Zobo ingredients – depending on the flavour you want

Zobo juice or extract as it is has a kind of sour taste, and that is why we add sugar to it t have a sweet taste. People these days tend to avoid sugars because they are watching their weight or wary of diabetes. If you do not want sugar, you can add sweeteners such as Nutri-C or foster Clark’s pineapple flavour.

It is important to know that if you use the foster Clark’s pineapple flavour, you should not use sugar again. I know of people that don’t like using artificial sweeteners and ingredients in their entirety. If you fall into this category, you can use very ripe Pineapple – it will only add more to the cost of production of the Zobo. If you are not selling it, why not use that?

Some people also add garlic. I don’t really like the taste and smell, so sometimes, I leave it out of my own Zobo. If you decide to use it to make your Zobo drink, add 1 glove of garlic to the ingredients listed above.

How to Prepare The Zobo Drink

Buy clean calyx of Zobo Hibiscus and wash with water – you may want to ask for “zobo leaf” in the market rather than hibiscus calyx. Even if they appear clean, you still should was with water because they are usually displayed in the market in containers with no lid, so you can expect to have dust particles on the surfaces. It may appear you have washed all the colour off but it has a lot more in store. So, don’t worry.

Hibiscus sabdariffa zobo leaf

  • If you are using Pineapple, peel and slice it. Peel and slice the ginger (and garlic if you are using it) too into small pieces. Clean them with some water.
  • Put all the Zobo calyx you want to use and the sliced Pineapple into a clean pot and pour water into the pot until it covers them all.
  • Boil for 5 minutes and add your ginger, and garlic if you are using it.
  • Add more water to the pot and leave all the ingredients to boil for 30 minutes.

After this period, you can now remove heat and allow the pot and its content to cool. When cool, wring out the juice from the pineapples and Zobo leaves, leaving only the Zobo juice in the pot. Sieve this juice, first through a sieve to remove the large particles and then through a fine mesh or Muslin cloth to remove this finer particles.

zobo drink in a cup
You can now refrigerate your zobo drink and serve when chilled. Some people add lemon and some other stuffs as additional flavour and I will find time to share information on this in the future. Enjoy your zobo drink.

Categories
Food Processing

How To Cook Beans So You Don’t Fart After Eating

Let me first of all make something clear before I start discussing about the topic of this post. We all call the common bean (Vigna unguiculata) that we eat beans, beans – but beans is a is a common name for large plant seeds of several genera of the family Fabaceae (alternately Leguminosae) which are used for human or animal food. The common one that we eat is called Cowpea. It has a number of common name such as crowder pea, blackeyed pea, southern pea.

Beans generally are rich in protein, while many of them are high in fiber and antioxidants. Beans are good for reduction of our waistline as well aid in disease prevention. Despite all these benefits, which many people are aware of, a lot people want to stay clear of Cowpea because they start farting or passing out gases after eating it. This does not have to be so because there are ways that you can cook your beans, such that you won’t have to be clearing the room hours after.

cooked beans
COMING SOON: Many Benefits of Beans That Make Them Superfoods

Before I talk about the methods that you can use to cook beans to prevent farting after, let me explain in clear and concise terms what causes this flatulence. Beans contain a class of carbohydrates called Oligosaccharides (e.g. raffinose and stachyose), some of which cannot be processed by our digestive system.

When we eat beans and they get to our intestine, the Oligosaccharides remain there as we do not have the enzymes or any other thing whatsoever to digest the. After the Oligosaccharides pass into our large intestine, the bacteria present there start to break them down. During the process, the bacteria release several different types of gases, mainly hydrogen, nitrogen and carbon dioxide. About 33% of these bacteria also end up producing methane and this is the one that smells.

Click below to pages 2 and 3 below to see the tips for cooking beans so that you don’t pass gas after eating…

Categories
Food Safety

Allergies/Dangers Associated With Eating Peanut

Few years after I was posted to Ketu Special Children Center; my present place of work, the nutrition department which I am part of, was faced with the challenge of raising the weight of our severely malnourished children. The idea of fortification popped into one of my colleagues and we decided to fortify the children’s meals with peanut butter. Without doubt, as professionals, we are aware of the allergy and numerous health benefits of the legume. We kick-started with a fact-finding mission to determine the level of tolerance in the children. Fortunately, none of the children showed any sign of allergies or intolerance.

Not quite long, one of our care givers who was on annual leave during the implementation period of peanut butter resumed duties. A diligent woman that she is, she did not waste time to start her work. She quickly picked one of the non ambulatory children’s meals in order to feed one of them. After feeding this young boy, the caregiver started scratching her body. Within few minutes, her entire skin had swollen. Then, we rushed her to our clinic. The long story was that she was allergic to groundnuts and was unaware that groundnut had been included into the children’s diet before she resumed. Else, she would have avoided it. This incident triggered the need for me to write on this article.

peanut allergy symptoms
Photo Credit: au.news.yahoo.com

Let me make it clear that the woman did not taste out of the blenderized meal, she only fed a child. What if she had tasted?

If I am not making any error, peanut allergy is perhaps one of the most serious and dangerous food allergies one can have. In some severe cases it has been found to be life threatening (Anaphylaxis). You cannot leave these reactions to chance. Once you discover you are allergic to any form of nut, do yourself a favour by visiting a Medical Doctor for further medical checkup. Let’s go ahead to describe some terms.

Short Description of Peanut Allergy:

According to WebMD, peanut allergy is a reaction that occurs when your body mistakenly identifies peanuts as harmful substances. When you eat peanuts or food containing peanuts, your immune system —the body’s natural defense system that fights infections and diseases —overreacts and can cause a serious, even life-threatening response. I am sure you can relate this definition with the scenario narrated earlier in this article.

So, What Causes Peanut Allergy?

The immune system determines the type of response your body will give based on the toxicity or otherwise of ingested items. In this situation the immune system overreacts and releases chemicals into the blood. Once they get into the blood, the chemicals have the ability to affect different organs in the body such as skin, nose, lungs etc. In most cases, it is unclear why these reactions occur in some individuals.

What Are The Symptoms Peanut Allergic Reaction?

The symptoms of peanut allergy can be a mere tingling sensation in the mouth followed by swelling of the face, throat, skin and mouth. This can also lead to difficulty in breathing, an asthma attack, anaphylactic shock and death. Less severe reactions include rashes, itches and stomach upset.

ADVICE: Once you have noticed any of the above symptoms any time you consume peanut, you will do yourself a great favour by avoiding all other nut products, including pressed nut oils and any products processed on the same equipment as nuts. This allergy is so severe that even minute amount of peanut can trigger a dangerous allergic reaction. Also, check the labels of packaged foods to see if nuts have been included in any form.

It is also in record that some people outgrow peanut allergies while others do not. For individuals who were diagnosed with peanut allergy at infant, they stand a chance to get over it than those who developed it from age three and above who might live with the allergy forever. Whichever way, speak to a medical professional.

ALSO SEE: Simple Method For Making Peanut Butter At Home

Allergic to peanut? STAY CLEAR!!!

Categories
General

6 Unusual Things Eaten By Nigerians As Food

I know I am going to receive some bashing for this but I still want to write about this. I have seen people eat a lot of things in Nigeria, things that I sometimes cannot even touch with my hand. This is especially true when it comes to meat; Nigerians that eat them would tell you  “meat na meat” (meat is meat irrespective of the source). People eat pigeon all over the  world and I can’t even imagine eating birds like that. I’m not saying it’s bad but I just can’t eat it.

Unusual Things Eaten By Nigerians as Food

I thought long about these things that we eat in this part of the world but may be strange to people from other parts of the world – unless those in the farm settlements over there. Finally, I came up with this simple list of some foods that I think are really unconventional as foods but when I talked to some people, I deduced that unusual might end up being a matter of where you have lived and what you have been exposed to in life.

1. Snakes

Even the sight of these crawling creatures can make me come out of my skin. I simply don’t like seeing them and this makes me wonder why someone would eat snakes. Often when I see people go through a lot of trouble to kill a snake (mostly venomous), it just get me thinking – “what if they get bitten by this snake?”, “how big is even this snake?”. The stress is not just worth it.

Categories
Food Recipes

Simple Method For Making Peanut Butter At Home

I am really glad to share this article with you because I have made peanut butter countless times as it is used regularly at my place of work for therapeutic purposes. It will interest you to know how simple this product can be made at home using readily available kitchen equipment. Without doubt, most lovers of peanut and peanut butter are certainly not aware of the savings they can make by making their own peanut butter.

In this short post, I will be sharing with you step by step method to follow in order to arrive at your own homemade creamy peanut butter. I am certain you will enjoy it with fresh slices of bread…Hmmmm yummy. Now let’s proceed.

Ingredients for Peanut Butter

  • One bottle of peanut or groundnut
  • Salt (Optional)
  • Vegetable oil
  • Cocoa powder (Optional)

peanut butter
Photo Credit: peanutbutterlovers.com

Equipment Needed

  • A powerful blender or Food processor

Method

  • Pour the entire well peeled roasted groundnut or peanut into the blender. If your blender cannot contain it, process the peanut in 2 batches.
  • Start the blender at high speed and blend for about 1 minute. Stop and start the blender again until the groundnut had completely turned into crumbs while producing little oil. Do not use you blender continuously for more than a minute it could damage the motor.
  • Add two table spoons of vegetable oil. This is because some groundnuts do not contain enough oil to make the peanut butter creamy. So you can adjust the quantity of added vegetable oil from one table spoon to four table spoons depending on the oil production level of the groundnut.
  • Stop the blender and add a pinch of salt. This is clearly optional since most groundnuts had been well salted.
  • Continue blending at high speed while occasionally changing to low speed. Do this for about a minute or two. Watch the peanut if it had completely turned creamy or puree like.
  • Stop the blender and scoop out the peanut butter into a jar or plastic container.
  • Depending on your taste, you can decide to add a tea spoon of cocoa powder or a table spoon. This will change the colour of the peanut butter from light brown to dark brown.
  • Keep in the refrigerator to solidify slightly.
  • Your peanut butter is ready.

One thing I love about this homemade peanut butter is that you can determine the ingredients to add and their quantities which make it quite unique and healthy unlike the processed ones sold in the grocery stores that one cannot ascertain the quantities of ingredients added.

Note that you cannot get your homemade peanut butter to be as creamier as the factory made ones but they would not be bad on slices of bread. It is cost effective and you could also use the opportunity to teach your children.

ALSO SEE: Peanut allergies with associated dangers and nutritional benefits.

Categories
Food & Body

6 Common Foods That Will Surely Make You Fat

I don’t even know why I am writing this post. Honestly! What I can tell you is that I received two requests from two different readers of this blog. One wants to know the foods that we eat everyday that can make one gain weight or fat so that she can avoid them. Ironically, the other person wants to know how she can get fat. Isn’t that funny? In this world where many girls just want to do what they see celebrities do on TV, why would anyone want to get fat? Girls just want to get slim.

I discussed this with a girl that explained to me that “not every girl wants to get thin”. She told me some girls just want to have the body of the Kim Kardashians, Jennifer Lopez, Amber Roses, Sofia Vergaras of this world – not fat and not too thin. Then I reasoned with her and though of writing this article for the two people.

cereal and milkHere are Some Everyday Foods That Make Us Fat

Common could be a relative word here but I can tell you that most of the foods mentioned here are those that I see often. I also asked questions from few people and many of them considered many of these foods to be common. Here they are;

See them from page 1 to the last page… you will be surprised…

Categories
Knowledgebase

The Brands of Yoghurt You Must Stop Buying

Many of us drink yoghurt and enjoy drinking it. Yoghurt is good for the body and if you recall, I mentioned it as part of foods that give you a fresh and younger-looking skin. Yoghurt is made from milk and it could be a very good source of calcium and proteins which we all need for our bones and body tissues. Some of them are even used as probiotics these days and consuming them only does one thing to the body – a world of good.

so called yoghurt bottles

Another very good thing about yoghurt is that, even though it is being made from milk, people that are lactose intolerant can take it and still derive all the important nutrients of milk from it. When yoghurt is being made, the lactose in the milk gets converted to lactic acid — making it safe for lactose intolerant people to consume. You can count on me to write about the full health benefits and nutritional facts of yoghurt.

Why should you stop buying some Yoghurt brands?

First of all, I am wrong to be calling them Yoghurt because many of them are not even what they say they are. To build a good premise for my argument, let me give you the definition and properties of yoghurt.

What is Yoghurt?

It is a custard-like food with a bit sour flavor, prepared from milk curdled by bacteria, especially Lactobacillus bulgaricus and Streptococcus thermophilus, and often sweetened or flavoured.

Many yoghurt brands that you would see in many developing countries including Nigeria make products that are called yoghurt, but not yoghurt in the real sense. This could be dangerous for someone that was given medical advise to consume yoghurt as part of his diet. Of course, he thinks he buys and drinks yoghurt but what he has been buying is something else. Our regulatory bodies should do more to ensure that our companies make labels that are correct, accurate and not misleading.

Many of these companies make their yoghurt the same way, but what is different is what they do to it after production.

What Defines A Good Yoghurt?

A good yoghurt should contain the live, active bacteria that was used to ferment the yoghurt after production. These beneficial active cultures promote a healthy intestinal environment. This is the reason any good yoghurt manufacture would write on their label that you keep the Yoghurt refrigerated to slow down or halt the activities of the microorganisms. If you do not do this, the microorganisms continue to ferment the Yoghurt outside the refrigerator and in no time, it spoils.

This is how yoghurt should be but what you often see here is “yoghurt” packed in bundles and left on the shelf at different stores. Some even pack them in stacks under the sun and leave them there until whenever they decide to refrigerate them. Of course, they are not going to get spoilt because the manufacturers have killed the microorganisms after production.

What Brands of Yoghurt Should You Stop Buying/Drinking?

I am not going to be mentioning brand names here but will only be telling you what to look out for on different brands of Yoghurt to decide whether to buy it or not.

Since the microorganisms have been killed, there is no bacteria to make it spoil at normal room temperature, therefore they can be stored anyhow. If you see any yoghurt that is not in the refrigerator, DO NOT BUY THEM — they are not yoghurt. However, if you just want to take something that tastes like yoghurt but do not have all the health benefits, go ahead and buy.

Check the labels of the yoghurt, if it does not contain a warning that you should keep refrigerated, you may want to avoid it. Some may include a statement like “best served chilled” but it is not the same as a statement telling you that your product remains in good state only if you refrigerate it.

Check the expiry date: when you see yoghurt with 6-month expiry date stored in the normal room temperature, don’t buy it. A real yoghurt can only stay for about 2-3 months if it is frozen and many manufacturers would not even want to honestly advise you to freeze yoghurt. It has effects on the texture and ultimately, the mouth-feel of the product. I’ll advise that you only refrigerate yoghurt if you want to enjoy it. It would only be able to stay for about 1-2 weeks in the refrigerator.

Finally, a one litre bottle of real yoghurt would normally be more expensive than one that has had its beneficial organisms killed.

COMING SOON: The Quick Way To Make Your Own Yoghurt At Home

Categories
Food Recipes

Simple Way To Make Nigerian Kunun Zaki At Home

Kunun is a traditional beverage drink produced from cereal grains such as Sorghum, Millet and Corn.Some people even use rice to make Kunun but I believe it does not make any sense if what you intend to do is sell. How would you make profit out of that? Rice is not cheap in this part of the world. Kunun is mostly consumed in the northern part of Nigeria where these cereals are majorly cultivated.

As I write this article, I can remember how we used to keep some money in our secondary school days to buy cold Kunun zaki after school hours and drink with straw as we walk home. I still love it till today but I was always scared of buying it because I was not sure of the production hygiene. Now, I make it easily whenever I need it. I store in the refrigerator for days too.

kunun zakiActually, there are different types of Kunun that exists; they are four (4) in number;

  1. Kunun Tsamiya
  2. Kunun Zaki
  3. Kunun Gyada
  4. Kunun Kanwa

About Kunun zaki and How To Make It

The most common one that we see around and buy is the Kunun zaki, I can confirm that to us. I am still trying to investigate the difference between these “Kununs” and feed you back once I get something meaningful. My guess is that they are names after the type of cereal being used. Kunun zaki is a non-alcoholic drink. It is served as a refreshing drink in homes and some social gatherings.

Ingredients & Material Needed

  • Grains (millet, sorghum or maize)
  • Spices (cloves, black pepper, red pepper, ginger)
  • Sugar (to taste)
  • Blender or mill
  • Sieves
  • Bottles and crown corks

How to prepare it

  • Take 4 cups of the grain you decide to use for the Kunun and put in a bowl of water (use grains with hulls removed)
  • Leave the grains inside the water for 12hours and discard the water. Some say they use 24 hours but I prefer this so that the maize does not start to ferment or grow.
  • Put the grains and all the spices in a blender, blend into a very smooth puree
  • Sieve the resultant puree and throw away the shaft left. You may add some water to make sieving easier.
  • You should now leave this smooth puree for some hours to settle. After this, throw away the water over the settled puree or slurry.
  • Divide the mixture into two parts (Part one should be two thirds of the mixture, and the other part, one third of it).
  • To the first part, add a small quantity of water, then add boiling water in a ratio of 4 cups of water to 1 part of the slurry. The hot water will make the slurry become a little gelatinized.
  • Mix the second part with cold water in a ratio of 3 cups of water to 1 part of slurry and add this to the first part above.
  • You should now mix these two parts together with your sugar (to taste) to get your sweetened Kunun zaki.

Kunun zaki is usually enjoyed cold, therefore, you may want to divide into bottles, cover with crown corks and store inside the refrigerator.

Categories
Food Recipes

OnionEgg Recipe: See How To Make This Nutritious Food

Hello friends, I have been postponing to share this article for about three weeks now because I felt it was too simple a recipe until I shared the idea with another food enthusiast who actually loved it completely. She went ahead to try it and she called to say it tastes great. In fact she had introduced it to her mum who is diabetic. In her words: “Guy, how you take think am, although very simple but it is great and healthy. I love it bro”. It was then I realized that the food recipe I stumbled upon as a result of my curiosity in trying new things is worth sharing with the public.

Many of you are used to frying eggs and adding few slices of onions but in this meal, onions would the food to fry while adding egg and any other ingredient that you love to have in a meal like this.

onion eggs recipe

What Is Onion Egg or Onionegg?

Onionegg is a type of food that majorly consists of onions and egg. I guess you are saying; “what exactly is special about it? Whenever I fry my eggs, I add slices of onion”. Yes, you are absolutely correct but the method of preparation is slightly different. Before I share with you the method, I will like to briefly share the health benefits associated with this meal.

What Onions Do To Your Body

  • Onion helps to control glucose level which is quite important for diabetes patients
  • It is loaded with numerous anti-oxidants that fight off cancer causing agents.
  • It also contains significant amount of vitamin C that helps to improve the immune system
  • The bulbous plant also helps in proper digestion and prevents against stomach ulcer.

What Eggs Do To Your Body

  • It contains high amount of protein which is important for repair of tissues in our body.
  • It also contain a substantial amount of Omega 3 fatty acid which helps in proper brain function and weight management. It was included in this post that listed foods that help you get sharper memory.

In this article, I am not writing on the health benefit of onions and eggs else, I would have highlighted many benefits. You can check related posts on this blog. Let’s move on to the making of Onionegg.

How To Make Onionegg (Recipe)

Ingredients

  • A large size onion bulb or two smaller sizes.
  • One egg
  • Salt(put to taste)
  • Pepper( optional)
  • Cray fish( optional)

Method

  • Peel your onions and wash them
  • Cut them into five or six pieces and grate them or blend them till you get a pasty form. A blender is better.
  • Add your egg to the blended or grated onions and whisk properly. The blended onions have to be at least twice the quantity of added egg.
  • Add other ingredients like salt, crayfish and pepper; then whisk properly until smooth.
  • Place frying pan on cooker and add small amount of any healthy oil that you have. I used coconut oil.
  • At frying point, add your mixture and fry the way you would prefer. Onionegg is ready.

You would realize that the simple difference is the large size of onion used. The main food here is onions. This recipe is for one serving. You can give it a try particularly if you are a lover of onions like me, you will be glad you did.

ALSO SEE: 3 Tricks That I Use To Cut/Dice Onion Without Crying

Remember this is healthy and do not forget to share.

Categories
Food Processing

3 Tricks That I Use To Cut/Dice Onion Without Crying

I like eating onion in foods a lot but I just always had difficulty in enduring those eye stings and keeping the tears from rolling. It’s really really hard. I have know about this delicious and nutritional onionegg recipe for quite a while now but it was always a struggle to cut all the onions needed. This stopped being so when I discovered these three tricks that help me cut and dice onions without tears. I am going to share them with you in this short article.

Suggestions On Cutting Onions Without Crying

I have read a lot of recommendations on various articles on the internet – some were as dumb and whatever you could think to be the dumbest but I did them anyway with no success. I was the one looking for something. I even read articles where several people claimed the recommendations worked for them while some said it worked but only felt slight stings.

onion dicing


At a point, I started feeling different things might work for different people and with different varieties of onion, so I kept reading and experimenting.

Some of the tips I know you must have come across before include “cut the onion while holding your tongue to the roof of your mouth”, “light candles before cutting the onion”, “chew gum while cutting the onion” and many more like that. The second one appears dumb right? I feel so too.

How I Cut Onions Without Crying/Feeling Sting In My Eye

I did not get lucky with any of those recommendations but I kept trying until I stumbled upon these three that I now use till today. You can give them a try too and see if they work for you.

1. Freeze or Refrigerate The Onion

I noticed that whenever I pick onion out of the freezer and cut, I never felt the stinging sensation that happens in the eye and there were no tears. I though this just happened by accident, then I did an experiment on it. I took the same type of onion, put one in the freezer and cut the other immediately.

I cried when I cut the onion like that but when I brought the other one out of the freezer and cut, it was painless and tear-free.

onions in refrigerator

When you want to do this, do not allow the onion to be too frozen to make it hard. This will make it hard to cut and even destroy the tissues.

Another interesting tip on page 3 (click below) …

2. Keeping The Onion In Water

I noticed this one when I used the vegetable grater for a period of time. During this time, I grate pepper, tomatoes and onions to make my rice stew; and to garnish when cooking spinach. When I want to do this, I get a bowl and put all the pepper, tomatoes and onions in the water and put one by one in the vegetable grater. I would take the onion last because I was scared of what would happen to my eye.

RECOMMENDED: See What Causes Us To Cry When Peeling Onions

The I would notice that nothing happened or I simply just felt little pain in the eye towards the end of grating.

onions under water

Later, I started putting the onions in the water like 30 minutes before I grate and it has been working for me ever since.

3. I Cut It Under Water

I actually read about this one online and I gave it a trial, it worked. If I don’t really have the 30 minutes luxury to soak the onion in water, I simply adopt this method. What I do is to get a big bowl of water, get my knife and onion, dip both my hand in the bowl full of water and cut the onions therein.

Some have argued that useful components of the onions are leached into the water. I think that there are prices to pay when you do stuffs like this. If you want to get all the nutrients and other components of your onion, then be prepared to cry for it.

Finally, some women have told me that they have noticed that tears do not come out and their eyes don’t burn when they wear contacts and cut onions. I have heard this from more than six women. I have not tried this but I think it is worth giving a shot.

Tips and tricks recommended by FoodsNG readers…

Bethel:

Chewing gum while peeling onions also stop someone from crying

Frances:

First cut out a small onions and put in ur mouth before cutting d rest. Close ur mouth while cutting others. It works like magic

Teresita Cunanan:

Wipe the chopping board with vinegar before you slice the onions

Uby:

Rub salt round the onions and cut it. No drop of tear will come out. It helps

Please, if you have any other trick that you use with success, please let us know by dropping us a line in the comment section. You can also check what others have written there too. Thank you!

ALSO SEE: Onions And 4 Other Foods That Help Reduce Belly Fat

Categories
Knowledgebase

See What Makes Us Cry When Peeling/Cutting Onions

Have you ever wondered why you cry and and feel this stinging sensation when you peel or cut onions? Or you just simply don’t care enough to know? As a student of Food Science and Technology, I did a little digging about it around 2008 and knew the reason why we cry when we peel onions. The chemistry is just very simple and I am going to make this article as short as possible. The stings and pains in the eye are caused by something in the onion but the crying is caused by our brain. You can’t blame the brain, it’s only trying to help reduce the pain.

So, What Causes Your Eyes Release Tears In Onion?

Peeling, cutting, dicing or crushing an onion means you are cutting the tissues. While doing this, several components in various cells mix together to produce the substance that causes the painful stings in the eye. That explains in to the layman.

onion dicing

If we want to go a little bit technical, during the growth of onions on the field, it absorbs sulphur from the soil. When we cultivate and peel or cut this onion, it breaks the cells within the onion like I explained above. This action releases certain enzymes in the Onion. The enzymes react with the sulphur, creating amino acid sulphoxides.

When this happens, it creates the highly unstable syn-propanethial-S-oxide, which is a combination of sulphuric acid, sulphur dioxide, and hydrogen sulphide. Syn-propanethial-S-oxide in its gaseous state is able to diffuse out into and around the room where you are. It then comes in contact with the water in your eye, which triggers a burning/stinging sensation via the ciliary nerve of the eye.

How Our Eyes and Brain Reacts To This

Lachrymal gland, found just above the eyelids is responsible for regulating tears in the the eyes. When the irritation start and you feel the stings in your eye, the brain gets  the message and decides to react to help relieve the pain. The brain pushes the lachrymal glands into releasing the tears, trying to flush the irritant out of your eye(s) with the tears. This does not happen in onions that we have cooked because cooking heat already inactivates the enzyme needed to make the troublesome syn-propanethial-S-oxide.

So, now you know what causes the burning sensation in your eye when you peel onion and why you cry shortly afterwards.

COMING TOMORROW: 3 Tricks That I Use To Cut/Dice Onion Without Crying [Works]

If you don’t want to miss this article, please subscribe to our free to our updates now.